Roblox is one of the most popular online gaming platforms in the world, with over 200 million monthly active users playing everything from adventure games to obstacle courses and roleplay simulations. Whether you want to share your epic moments, build a YouTube channel, or just keep a personal highlight reel, knowing how to record Roblox gameplay without lag is an essential skill for any serious player.
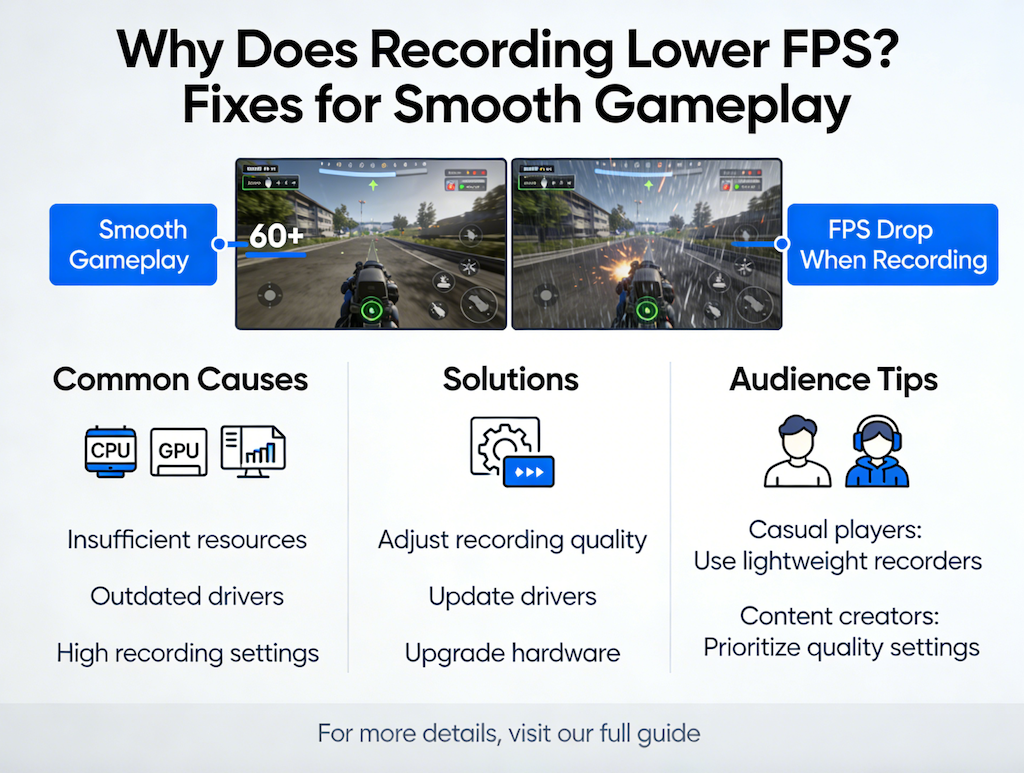
The challenge with recording Roblox is that the game itself demands CPU and GPU resources, leaving fewer resources for a screen recorder. Use the wrong tool or settings, and your game stutters, your recording looks choppy, or both. In this guide, we walk you through everything — from choosing the best recorder for Roblox to the exact settings that deliver smooth, high-quality captures every time.

Why Record Roblox Gameplay?
Recording Roblox has never been more relevant. The rise of gaming content on YouTube, TikTok, and Twitch has turned ordinary players into content creators — and Roblox's huge community means there's always an audience for great gameplay videos. Whether you're an experienced creator or just getting started, having a reliable Roblox screen recorder opens up a world of possibilities.
| Use Case | Description | Popular For |
|---|---|---|
YouTube Content |
Create gameplay videos, tutorials, and montages |
Content creators |
Highlight Clips |
Save epic moments, wins, or funny fails |
All players |
Game Reviews |
Record new Roblox games to review or showcase |
Reviewers, influencers |
Tutorials & Guides |
Show other players tips, tricks, and strategies |
Community helpers |
Personal Archive |
Keep memories of in-game events and achievements |
Dedicated fans |
Beyond content creation, recording your Roblox sessions can help you analyze your own gameplay, spot areas for improvement, and share bugs or glitches with developers. No matter your reason, a lag-free Roblox screen recorder is an indispensable tool in your gaming toolkit.
System Requirements for Smooth Recording
Before diving into settings, it's important to understand that recording gameplay is more demanding than just playing it. You need enough headroom in your PC's CPU, GPU, RAM, and storage to handle both Roblox and the screen recorder simultaneously without dropping frames.
| Component | Minimum (720p 30fps) | Recommended (1080p 60fps) |
|---|---|---|
CPU |
Intel Core i5-8th Gen / AMD Ryzen 5 |
Intel Core i7-10th Gen / AMD Ryzen 7 |
GPU |
NVIDIA GTX 1050 / AMD RX 570 |
NVIDIA RTX 3060 / AMD RX 6600 XT |
RAM |
8 GB |
16 GB or more |
Storage |
HDD with 100+ MB/s write speed |
SSD (NVMe preferred) |
OS |
Windows 7 / 8 |
Windows 10 / 11 (64-bit) |
Key Insight: The single biggest factor in lag-free recording is using GPU hardware encoding. When your screen recorder uses NVENC (NVIDIA), AMF (AMD), or Quick Sync (Intel) instead of the CPU, it frees up your processor entirely for Roblox. LosslessRec supports all three hardware encoders and automatically detects the best option for your system.
Even on mid-range PCs, enabling GPU encoding in LosslessRec can eliminate most lag issues when recording Roblox. If your PC meets only the minimum specs, follow the tips in the lag-prevention section below for additional optimizations.
How to Record Roblox with LosslessRec (Step-by-Step)
LosslessRec is purpose-built for high-performance gameplay capture. Its lightweight engine, GPU acceleration, and flexible recording modes make it the best recorder for Roblox for both beginners and experienced creators. Here's how to get started.
Step 1: Download and Install LosslessRec
Getting LosslessRec up and running takes less than two minutes:
- Visit the LosslessAI Download Center and download the LosslessRec installer.
- Run the .exe installer and follow the on-screen setup wizard.
- Launch LosslessRec from your Desktop or Start Menu shortcut.
- On first launch, the software will automatically detect your GPU and suggest the best hardware encoder.
Pro Tip: Run LosslessRec as Administrator to ensure it has full access to system audio capture and GPU encoding features. Right-click the shortcut and choose "Run as administrator".
Step 2: Configure Recording Settings
Before hitting record, spend 60 seconds configuring LosslessRec for Roblox. Open Settings → Recording and apply the following:
- Recording Mode: Select Game Mode or Full Screen to capture Roblox with the lowest latency.
- Resolution: Set to 1920×1080 (1080p) for YouTube-ready output.
- Frame Rate: Choose 60fps for smooth motion in fast-paced Roblox games.
- Encoder: Select H.265/HEVC (GPU) — NVENC, AMF, or Quick Sync based on your GPU.
- Bitrate: Set to 15,000–20,000 kbps for 1080p 60fps.
- Output Format: MP4 for universal compatibility.
Step 3: Start Recording Roblox
With settings configured, you're ready to capture your Roblox session:
- Launch Roblox and load into your chosen game.
- Switch back to LosslessRec and click Game Recording or select Full Screen capture.
- Choose the Roblox window from the application list if prompted.
- Press F9 (default hotkey) or click the red Record button to begin recording.
- Play Roblox normally — LosslessRec runs silently in the background without interfering with your game.
- Press F9 again to stop recording when you're done.
Hotkey Tip: You can customize LosslessRec's hotkeys under Settings → Hotkeys. Set a convenient key combination that doesn't conflict with Roblox controls, such as Ctrl+F9 for start/stop and Ctrl+F10 for screenshot.
Step 4: Access and Export Your Recording
After stopping the recording, LosslessRec saves the file automatically to your configured output folder. You can:
- Open the recording directly from the History Panel in LosslessRec.
- Use the built-in Video Editor to trim the intro, cut out loading screens, or add text overlays.
- Export to MP4 at your target resolution for direct YouTube upload.
- Use LosslessConverter to convert to other formats if needed for different platforms.
Best Recording Settings for Roblox
Choosing the right settings is critical for balancing video quality with game performance. The table below shows recommended configurations depending on your PC hardware tier and your intended output platform.
| Setting | YouTube / High Quality | Balanced (Mid-Range PC) | Low-End PC |
|---|---|---|---|
Resolution |
1920×1080 (1080p) |
1920×1080 (1080p) |
1280×720 (720p) |
Frame Rate |
60fps |
30fps |
30fps |
Encoder |
H.265/HEVC (GPU) |
H.264 (GPU) |
H.264 (CPU) |
Bitrate |
15,000–20,000 kbps |
8,000–12,000 kbps |
4,000–6,000 kbps |
Audio Bitrate |
320 kbps (AAC) |
192 kbps (AAC) |
128 kbps (AAC) |
Output Format |
MP4 |
MP4 |
MP4 |
For most creators targeting YouTube, the H.265/HEVC encoder at 1080p 60fps is the gold standard. HEVC delivers significantly smaller file sizes compared to H.264 at equivalent quality — a one-hour Roblox session at 1080p 60fps takes approximately 3–5 GB with HEVC versus 6–9 GB with H.264.
Comparison: LosslessRec vs Roblox Built-In vs OBS Studio
Not sure which tool is right for you? Here's how the most common recording options stack up for Roblox:
| Feature | LosslessRec | Roblox Built-In | OBS Studio |
|---|---|---|---|
Max Resolution |
4K |
1080p (limited) |
4K |
Max Frame Rate |
120fps |
30fps |
60fps+ |
GPU Encoding |
Yes (NVENC/AMF/QSV) |
No |
Yes |
Microphone + System Audio |
Yes (simultaneous) |
No microphone |
Yes |
Watermark |
No |
No |
No |
Ease of Use |
Very Easy |
Very Easy |
Complex |
Built-in Video Editor |
Yes |
No |
No |
Performance Impact |
Minimal (GPU encoding) |
Moderate |
Varies (needs tuning) |
While OBS Studio is a powerful free option, it requires significant configuration to achieve low-lag results on Roblox. The built-in Roblox recorder is convenient but severely limited in quality and features. LosslessRec strikes the ideal balance — easy setup, professional output quality, and a minimal performance footprint that keeps Roblox running smoothly.
How to Record Roblox with Game Audio and Microphone
Great Roblox videos aren't just about visuals — audio quality is equally important for keeping viewers engaged. Whether you're doing a live commentary, recording background music from the game, or mixing both, LosslessRec makes dual-track audio capture straightforward.
Setting Up Audio in LosslessRec
To capture both Roblox game audio and your microphone simultaneously:
- Open LosslessRec and go to Settings → Audio.
- Under System Sound, select your primary output device (e.g., Speakers or Headphones). This captures Roblox's in-game audio, music, and sound effects.
- Under Microphone, select your recording microphone from the dropdown list.
- Adjust the volume balance between system audio and microphone to ensure your voice doesn't overpower the game or vice versa.
- Use the Noise Cancellation toggle (if available) to reduce background noise from your microphone feed.
Audio Settings for Roblox Commentary:
- System Audio Volume: 70–80% — lets game audio be audible without overpowering your voice
- Microphone Volume: 100% — your commentary should be clearly audible
- Audio Format: AAC at 192–320 kbps for YouTube-ready quality
- Sample Rate: 48,000 Hz — standard for video production
- Enable Noise Reduction: Yes — reduces keyboard and ambient noise from mic input
Recording Only Game Audio (No Microphone)
If you don't want commentary and just want to capture Roblox's ambient sound and music, simply disable the microphone source in LosslessRec's audio settings. Set Microphone to "None" and keep System Sound enabled. This is ideal for montage-style videos where you'll add a music track during editing.
LosslessRec also supports audio-only recording mode, which is useful if you want to extract Roblox background music or ambient sounds for creative projects. Set the output to MP3 or AAC and disable video recording for a clean audio file.
Tips to Avoid Lag While Recording Roblox
Even with the best screen recorder, lag can creep in if your system isn't properly optimized. The following tips are practical, field-tested strategies that make a real difference — especially on mid-range or older PCs.
1. Always Use GPU Hardware Encoding
This is the single most impactful change you can make. CPU-based encoding (x264/x265 software encoding) uses a large portion of your processor — often 30–60% extra CPU load. Roblox needs that CPU budget too. Switching to GPU encoding in LosslessRec (NVENC for NVIDIA, AMF for AMD, Quick Sync for Intel) moves the encoding workload entirely to your GPU's dedicated hardware encoder, which is designed for exactly this task and doesn't compete with Roblox for resources.
2. Lower Roblox In-Game Graphics
Roblox has a graphics quality slider inside the game settings (Escape → Settings → Graphics). Lowering this from "10" to "5–7" significantly reduces GPU load without dramatically affecting the visual quality of your recording:
- Reduce Shadows quality — one of the most GPU-intensive effects in Roblox
- Disable Dynamic Lighting if available in the specific game
- Lower Render Distance to reduce draw calls
- Set Frame Rate Cap to 60fps in Roblox settings (prevents runaway GPU usage)
3. Close Background Applications
Every app running in the background consumes RAM, CPU, and sometimes GPU. Before recording Roblox, close the following:
- Web browsers with multiple tabs open (Chrome/Edge can use 1–2 GB of RAM)
- Discord (if not needed) — use Discord's overlay or phone instead
- Antivirus real-time scanning (schedule a pause for your recording session)
- Cloud storage sync (OneDrive, Dropbox, Google Drive) — can cause disk bottlenecks
- System update processes running in the background
4. Record to an SSD
At 1080p 60fps with a 15,000 kbps bitrate, LosslessRec writes approximately 112 MB per minute to disk. Mechanical hard drives (HDDs) can struggle with sustained writes at this rate, especially older ones. Using an SSD eliminates disk write bottlenecks entirely. If you only have an HDD, lower the bitrate to 8,000 kbps to keep write speeds manageable.
5. Use Windows High Performance Power Plan
Windows power settings can throttle your CPU and GPU on "Balanced" mode. Switch to High Performance before recording sessions:
- Go to Control Panel → Power Options
- Select High Performance (or create a custom plan)
- This prevents CPU clock speed throttling during recording
Quick Pre-Recording Checklist:
- GPU encoding enabled in LosslessRec (NVENC / AMF / Quick Sync)
- Roblox graphics set to Level 5–7 (not maximum)
- Chrome, Discord, and other background apps closed
- Recording output set to SSD
- Windows Power Plan set to High Performance
- Bitrate set to 15,000–20,000 kbps for 1080p 60fps
How to Edit and Share Your Roblox Videos
Once you've captured your Roblox gameplay with LosslessRec, the next step is polishing it for your audience. LosslessRec includes a built-in video editor suitable for basic to intermediate editing tasks, making it convenient to go from raw recording to shareable video without switching tools.
Basic Editing in LosslessRec
From the History Panel, click on a recording and select Edit to open the built-in editor. Key editing features include:
- Trim / Cut: Remove the beginning (loading screens) and end (post-game lobby) of your recording
- Split: Divide a long session into multiple shorter clips
- Add Text / Captions: Overlay text for player names, scores, or callouts
- Merge Clips: Combine multiple Roblox sessions into one highlight video
- Volume Adjustment: Increase or decrease audio levels per clip
Advanced Editing for YouTube
For more advanced editing — transitions, color grading, background music, intro/outro sequences — consider exporting the raw recording from LosslessRec and importing it into a dedicated editor. LosslessRec's MP4/H.265 output is compatible with all major video editors:
- DaVinci Resolve (free, professional-grade)
- Adobe Premiere Pro (subscription, industry standard)
- Kdenlive (free, open-source)
- CapCut (free, beginner-friendly with AI features)
Export Settings for YouTube
When exporting your Roblox video for YouTube, use these settings to ensure maximum quality retention through YouTube's re-compression:
- Resolution: 1920×1080 or 3840×2160 (4K for future-proofing)
- Frame Rate: 60fps (matches your recording)
- Codec: H.264 or H.265 — YouTube accepts both
- Bitrate: 15,000–20,000 kbps for 1080p 60fps export
- Color Space: BT.709 (standard for web video)
- Audio: AAC 192–320 kbps, stereo
Upload your finished video directly to YouTube. For Roblox content, include the game name in your title and tags, add a custom thumbnail featuring in-game action, and write a description that links to the games you played. This dramatically improves discoverability among Roblox's active search community.
Frequently Asked Questions
What is the best screen recorder for Roblox?
LosslessRec is widely regarded as one of the best screen recorders for Roblox in 2026. It supports GPU-accelerated encoding via NVENC (NVIDIA), AMF (AMD), and Quick Sync (Intel), meaning the encoding workload doesn't compete with Roblox for CPU resources. The result is a smooth, lag-free Roblox experience combined with high-quality 1080p or 4K output. Its built-in video editor and one-click export workflow make it ideal for Roblox content creators targeting YouTube.
How do I record Roblox without lag?
The key to recording Roblox without lag is GPU hardware encoding. In LosslessRec, go to Settings and select NVENC (NVIDIA), AMF (AMD), or Quick Sync (Intel) as your encoder — never use software/CPU encoding for Roblox. Additionally: lower Roblox's in-game graphics to Level 5–7, close background apps like Chrome and Discord, record to an SSD, and set Windows to High Performance power mode. These steps together virtually eliminate recording lag on most modern PCs.
Can I record Roblox gameplay for free?
Yes. LosslessRec offers a free trial that lets you record Roblox without a watermark. Roblox also has a minimal built-in video capture feature, but it maxes out at 30fps with no microphone support and limited quality settings. For YouTube-ready recordings with microphone commentary, LosslessRec's free trial is the better starting point. OBS Studio is also free but requires considerably more setup time to get working well for Roblox.
What recording settings should I use for Roblox on YouTube?
For Roblox videos targeting YouTube, the recommended LosslessRec settings are: Resolution 1920×1080, Frame Rate 60fps, Encoder H.265/HEVC (GPU), Bitrate 15,000–20,000 kbps, Audio AAC 192–320 kbps. These settings produce files that retain excellent quality after YouTube's re-compression. If your PC is lower-end, scale back to 30fps with H.264 GPU encoding and 8,000 kbps to keep the system running smoothly.
Conclusion
Recording Roblox gameplay without lag in 2026 comes down to two things: choosing the right recorder and enabling GPU hardware encoding. With LosslessRec, both are easy — the software automatically detects and configures your GPU encoder, and its lightweight architecture keeps Roblox running smoothly while capturing every frame in stunning 1080p or 4K quality.
Key takeaways from this guide:
- Use LosslessRec with GPU encoding (NVENC/AMF/Quick Sync) to eliminate recording lag
- Set resolution to 1080p 60fps and encoder to H.265/HEVC for YouTube-ready quality
- Enable System Audio + Microphone simultaneously for engaging commentary videos
- Lower Roblox graphics to Level 5–7 and close background apps before recording
- Record to an SSD to prevent disk write bottlenecks at high bitrates
- Use LosslessRec's built-in editor to trim and polish clips before uploading to YouTube
Ready to start creating Roblox content? Download LosslessRec free and record your first Roblox video today — no watermarks, no lag, no compromises.